
Apache Tomcat 7 How to Install & Configure
หน้าแรก JSP Apache Tomcat 7 How to Install & Configure
Apache Tomcat is the official Reference Implementation (RI) for Java Servlets and JavaServer Pages (JSP). Tomcat is an open-source project, under the "Apache Software Foundation" (which also provides the famous open-source industrial-strength Apache HTTP Server). The mother site for Tomcat is http://tomcat.apache.org. Alternatively, you can find tomcat via the Apache mother site @ www.apache.org.
This installation and configuration guide is applicable to Tomcat 7, as well as Tomcat 6 and the earlier versions.
(EE3072 P311 Students) This guide is NOT applicable to my EE3072 Module P311. Please read "Tomcat 6 - How to Install and Configure" instead.
How to Install Tomcat 7
Step 0: Read the Tomcat Documentation
Tomcat's documentation is available at Tomcat mother site @ http://tomcat.apache.org. Select "Documentation" ⇒ "Tomcat 7.0".
Step 1: Download Tomcat
- From http://tomcat.apache.org ⇒ Select "Downloads" ⇒ "Tomcat 7.0" ⇒ "7.0.xx" ⇒ "Binary Distributions" ⇒ "Core" ⇒ "zip" ⇒ "
apache-tomcat-7.0.xx.zip". - UNZIP into a directory of your choice. DO NOT unzip onto the Desktop (its path is hard to locate). I suggest using "
d:myproject". Tomcat will be unzipped into directory "d:myprojectapache-tomcat-7.0.xx". For ease of use, we shall shorten and rename this directory to "d:myprojecttomcat". Take note of your Tomcat installed directory. Hereafter, I shall refer to the Tomcat installed directory as$CATALINA_HOME(or%CATALINA_HOME%).Catalinais the codename for Tomcat 5 and above.
I recommend "zip" version, as you could simply delete the entire directory when Tomcat is no longer needed (without running any un-installer). You are free to move or rename the Tomcat's installed directory. You can install (unzip) multiple copies of Tomcat in the same machine.
Step 2: Create an Environment Variable JAVA_HOME
You need to create an environment variable called "JAVA_HOME" and set it to your JDK installed directory.
- First, check your JDK installed directory (the default is "
c:program filesjavajdk1.7.0" or "c:program filesjavajdk1.6.0_xx"). - Start a CMD shell, and issue the command "
SET JAVA_HOME" to check if variableJAVA_HOMEis set:prompt> set java_home Environment variable java_home not defined
IfJAVA_HOMEis set (by other applications), check if it is set to your JDK installed directory. - To set/change an environment variable in Windows 2000/XP/Vista/7:
Click "Start" button ⇒ "Control Panel" ⇒ "System" ⇒ (Vista/7) "Advanced
system settings" ⇒ Switch to "Advanced" tab ⇒ "Environment Variables" ⇒
"System Variables" (or "User Variables" for the current user only) ⇒
"New" (or "Edit" for modification) ⇒ In "Variable Name" field, enter "
JAVA_HOME" ⇒ In "Variable Value" field, enter your JDK installed directory (e.g., "c:program filejavajdk1.6.0_xx") - I suggest that you copy and paste the directory name to avoid typo error! - To verify, RE-START a CMD shell and issue:
prompt> set java_home
JAVA_HOME=c:program filejavajdk1.7.0     // Your JDK installed directory
Step 3: Configure Tomcat Server
The Tomcat configuration files are located in the "conf" sub-directory of your Tomcat installed directory (denoted as $CATALINA_HOME, e.g. "d:myprojecttomcat"). There are 3 configuration files:
server.xmlweb.xmlcontext.xml
Step 3a: server.xml - Navigate to Tomcat's "conf" sub-directory, and use a text editor (e.g., NotePad++, TextPad or NotePad) to open the configuration file "server.xml".
- Set the TCP Port Number: The default TCP port
number configured in Tomcat is 8080, you may choose any number between
1024 and 65535 to run your Tomcat server. We shall stick to port 8080 in
this article. (For production server, you should use port 80, which is
pre-assigned to HTTP as the default port number.)
<!-- Define a non-SSL HTTP/1.1 Connector on port 8080 -->
<Connector port="8080" protocol="HTTP/1.1" connectionTimeout="20000" redirectPort="8443" />
Step 3b: web.xml - Again, navigate to Tomcat's "conf" sub-directory, and use a text editor to open the configuration file "web.xml".
- Enabling Directory Listing: We shall enable directory listing by changing "
listings" from "false" to "true" for the "default" servlet, as shown in red.<!-- The default servlet for all web applications, that serves static --> <!-- resources. It processes all requests that are not mapped to other --> <!-- servlets with servlet mappings. --> <servlet> <servlet-name>default</servlet-name> <servlet-class>org.apache.catalina.servlets.DefaultServlet</servlet-class> <init-param> <param-name>debug</param-name> <param-value>0</param-value> </init-param> <init-param> <param-name>listings</param-name> <param-value>true</param-value> </init-param> <load-on-startup>1</load-on-startup> </servlet> <!-- The mapping for the default servlet --> <servlet-mapping> <servlet-name>default</servlet-name> <url-pattern>/</url-pattern> </servlet-mapping>
Step 3c: context.xml - Again, navigate to Tomcat's "conf" sub-directory, and use a text editor (e.g., TextPad or NotePad) to open the configuration file "context.xml".
- Automatic Servlet Reload: We shall add the attribute
reloadable="true"to the<Context>element, as shown in red.<Context reloadable="true"> ...... </Context>
Step 4: Start Tomcat Server
The Tomcat's executable programs are kept in the "bin" sub-directory of your Tomcat installed directory (denoted as $CATALINA_HOME).
Step 4a: Start Server - Launch a CMD shell. Set the current directory to "$CATALINA_HOMEbin", and run "startup.bat" (or simply double-click "startup.bat"
from Windows' explorer). A new console window will be started. Study
the messages (especially the Tomcat's port number). Future error
messages will be send to this console. System.out.println() issued by our Java servlets will also be sent to this console.
// Change the current directory to Tomcat's "bin" // Assume that Tomcat is installed in "d:myprojecttomcat" C:xxx> d: // Change the current drive D:> cd myprojecttomcatbin // Change Directory to YOUR Tomcat's "bin" directory // Start Tomcat Server D:myprojecttomcatbin> startup
...... INFO: Initializing Coyote HTTP/1.1 on http-8080 ...... INFO: Starting Coyote HTTP/1.1 on http-8080 ...... INFO: Server startup in 699 ms
Double check Tomcat server's HTTP port number on the Tomcat's console.
Step 4b: Start a Client to Access the Server - Start a browser (client), and issue URL "http://localhost:8080" to access the Tomcat server's welcome page. The hostname "localhost" (with IP address of 127.0.0.1)
is meant for local loop-back testing. For users on the other machines
over the net, they have to use the server's IP address or DNS hostname
in the format of "http://serverHostnameOrIPAddress:8080".
Step 4c: Shutdown Server - You can shutdown the server by running "$CATALINA_HOMEbinshutdown.bat". If Tomcat does not respond to the shutdown command, you could terminate Tomcat by pushing control-c (or control-break) on the Tomcat's console. DO NOT kill the cat by pushing the "close" button.
Step 5: Develop and Deploy a Web Application
Step 5a: Create the Directory Structure for your Web Application - First of all, choose a name for your web application. Let us call it "hello". Navigate to Tomcat's "webapps" sub-directory, and create the following directory structure for you web application "hello", as illustrated:
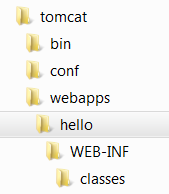
- Under Tomcat's "
webapps", create you web application root directory "hello" ("webappshello"). - Under "
hello", create a sub-directory "WEB-INF" (case sensitive, a dash not an underscore) ("webappshelloWEB-INF"). - Under "
WEB-INF", create a sub-directory "classes" (case sensitive) ("webappshelloWEB-INFclasses").
You need to keep your web resources (e.g., HTMLs, CSSs, images, scripts, servlets, JSPs) in the proper directories:
- "
hello": The is called the context root or document base directory of your web application. You should keep all your HTML files and resources visible to the web users (e.g., CSSs, images, scripts, JSPs) under the context root. - "
helloWEB-INF": This directory, although under the context root, is not visible to the web users. This is where you keep your application's configuration files "web.xml". - "
helloWEB-INFclasses": This is where you keep all the Java classes such as servlet class-files.
You may need to re-restart your Tomcat server.
Step 5b: Write a Welcome Page - Create the following HTML page and save as "HelloHome.html"
in your application's root directory "hello".
<html>
<head><title>My Home Page</title></head>
<body>
<h1>My Name is so and so. This is my HOME.</h1>
</body>
</html>
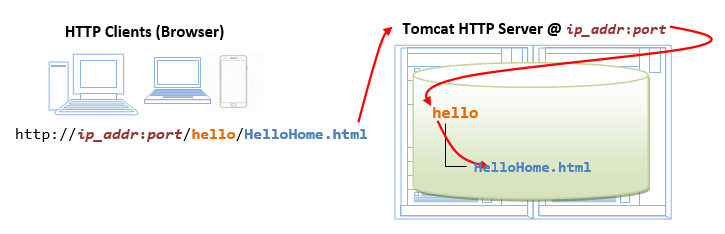
You can browse this page by issuing this URL:
http://localhost:8080/hello/HelloHome.html
Alternatively, you can issue an URL to your web application root "hello":
http://localhost:8080/hello
The server will return the directory listing of your base directory
(only if you have enabled directory listing in your configuration in
Step 3b). You can then click on "HelloHome.html".
Rename "HelloHome.html" to "index.html", and issue a directory request again:
http://localhost:8080/hello
Now, the server will redirect the directory request to "index.html", if the root directory contains an "index.html", instead of serving the directory listing.
You can check out the home page of your peers by issuing (or access your own server from another machine):
http://YourPeerHostnameOrIPAddress:8080/hello http://YourPeerHostnameOrIPAddress:8080/hello/HelloHome.html http://YourPeerHostnameOrIPAddress:8080/hello/index.html
with a valid "YourPeerHostnameOrIPAddress", provided that your peer has started his/her web server. You can use command "ipconfig" to find your IP address.
Step 5c: Servlets API Library -
Before we write our first servlet, we need to get the Servlets API to
compile our Java servlets. Servlets API is not part of JDK (but belongs
to Java EE). Tomcat also includes a copy of Servlets API.
COPY the Tomcat's Servlets API jar-file "$CATALINA_HOMElibservlet-api.jar" ($CATALINA_HOME denotes your Tomcat installed directory) into JDK's extension directory at "$JAVA_HOMEjrelibext" ($JAVA_HOME denotes JDK installed directory, with default at "c:program filesjavajdk1.7.0jrelibext").
(For Advanced Users Only) Alternatively, you could include the Servlet API jar-file in the CLASSPATH.
Open "Control Panel" ⇒ System ⇒ (Vista/7 only) Advanced system settings
⇒ Switch to "Advanced" tab ⇒ Environment variables ⇒ Choose "System
Variables" (for all users in this system) or "User Variables" (for
this login user only) ⇒ Choose "New" or "Edit"⇒ In "Variable Name",
enter "classpath" ⇒ In "Variable Value", enter ".;path-toservlet-api.jar", where "path-to" includes the drive letter and path of the Servlet API jar-file "servlet-api.jar".
Step 5d: Write a Test Java Servlet - A
servlet is a Java program that runs inside the web server. A web user
invokes a servlet by issuing an URL from the browser (client).
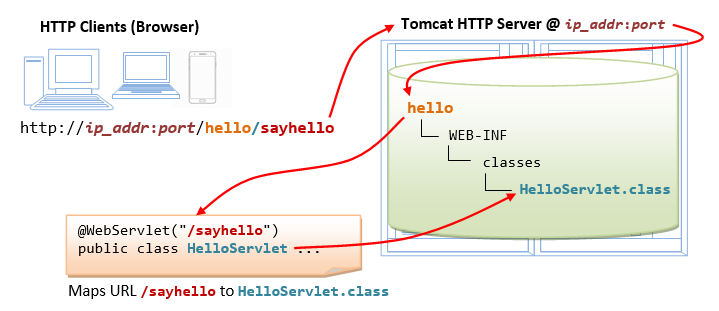
In this example, we are going to write a servlet called HelloServlet (which says "Hello, world!"). We will then configure such that web users can invoke this servlet by issuing URL http://host:port/hello/sayhello from the browser, as illustrated:
Write the following source codes called "HelloServlet.java" and save it under your application's "classes" (i.e., "webappshelloWEB-INFclassesHelloServlet.java". Compile the source into "HelloServlet.class". This servlet says "Hello" and echos some request information provided by the web user.
// Save as "webappshelloWEB-INFclassesHelloServlet.java" import java.io.*; import javax.servlet.*; import javax.servlet.http.*; public class HelloServlet extends HttpServlet { public void doGet(HttpServletRequest request, HttpServletResponse response) throws IOException, ServletException { response.setContentType("text/html"); // Set the response MIME type PrintWriter out = response.getWriter(); // Get a output writer // Write the HTML response message out.println("<html>"); out.println("<head><title>Hello, World</title></head>"); out.println("<body>"); out.println("<h1>Hello, world!</h1>"); // says Hello // Echo client's request information out.println("<p>Request URI: " + request.getRequestURI() + "</p>"); out.println("<p>Protocol: " + request.getProtocol() + "</p>"); out.println("<p>PathInfo: " + request.getPathInfo() + "</p>"); out.println("<p>Remote Address: " + request.getRemoteAddr() + "</p>"); out.println("</body>"); out.println("</html>"); } }
Step 5e: Configure Servlet's Request URL in "helloWEB-INFweb.xml" - A web user invoke a servlet, which is kept in the web server, by issuing an appropriate URL from the browser. We need to configure a request URL for our HelloServlet.
Create the following configuration file called "web.xml", and save it under "helloWEB-INF" (i.e., "webappshelloWEB-INFweb.xml").
<?xml version="1.0" encoding="ISO-8859-1"?>
<web-app xmlns="http://java.sun.com/xml/ns/javaee"
xmlns:xsi="http://www.w3.org/2001/XMLSchema-instance"
xsi:schemaLocation="http://java.sun.com/xml/ns/javaee
http://java.sun.com/xml/ns/javaee/web-app_3_0.xsd"
version="3.0" metadata-complete="true">
<!-- Define servlets for this web application -->
<servlet>
<servlet-name>HelloWorld</servlet-name>
<servlet-class>HelloServlet</servlet-class>
</servlet>
<servlet-mapping>
<servlet-name>HelloWorld</servlet-name>
<url-pattern>/sayhello</url-pattern>
</servlet-mapping>
<!-- Note: All <servlet> elements MUST be placed IN FRONT of the <servlet-mapping> elements -->
</web-app>
In the above configuration, a servlet having a class file "HelloServlet.class", is mapped to request URL "/sayhello", under this web application "hello". In other words, the full request URL for this servlet is "http://host:port/hello/sayhello".
This configuration file, saved under your web application "hello", is applicable only to this particular web application "hello".
IMPORTANT: For each servlet, you need to write a pair of <servlet> and <servlet-mapping> elements with a common <servlet-name>. Take note that all the <servlet> elements MUST be grouped together and placed IN FRONT of the <servlet-mapping> elements.
Step 5f: Invoke the Servlet - To run this servlet, start a browser (client), and issue the request URL configured earlier:
http://localhost:8080/hello/sayhello
You shall see the output of the servlet displayed in your web browser.
Try "View Source" to look at the output received by the web users.
Take note that the web users receive only the output of the servlet
(created via the out.println() statements), as follows.
They have no access to the servlet programs (which may reveal
confidential information of your organization).
<html> <head><title>Hello, World</title></head> <body> <h1>Hello, world!</h1> <p>Request URI: /hello/sayhello</p> <p>Protocol: HTTP/1.1</p> <p>PathInfo: null</p> <p>Remote Address: 127.0.0.1</p> </body> </html>
If Things Go Wrong...
- Check the Error Messages on Tomcat's Console. You need to scroll up slowly from the last message to look for the first-line of the error messages.
- Check the Tomcat's log files (at
"$CATALINA_HOMElogs"). - If the Tomcat console flashed and disappeared immediately, you can start the tomcat in the debugging mode by running "
catalina debug" and type "run" in the "jdb" prompt. Look out for the error messages. - Check your Tomcat configuration files ("
server.xml", "web.xml", "content.xml", etc.). I suggest that you revert back to the original configuration files to start Tomcat at port 8080. - If Tomcat can be started, but you cannot run your application. Goto the Tomcat's home page, and try the servlets/JSP examples to ensure that Tomcat is properly installed.
Common and not-so-Common Errors
Error Message: java.lang.NoSuchMethodError: javax.servlet.ServletContext.getSessionCookieConfig() Ljavax/servlet/SessionCookieConfig; Symptoms: Tomcat cannot start Probable Causes: This is a new method in Servlets 3.0 (which Tomcat 7 supports). There is a Servlets 2.x API is your CLASSPATH or JDK's extension directory. Solution: Check your CLASSPATH. Remove servlet-api.jar from JDK's extension directory if any. Error Message: 404 File Not Found Symptoms: Browser fails to retrieve the requested resource Probable Causes: Server cannot find the resource requested that matches the request URL. Solution: 1. For visible resources such as HTML files, check that particular resource reside under the context root. 2. For servlet, check the URL-servlet mapping in contextRootWEB-INFweb.xml. Make sure that you have compiled your servlet, and the class file resides in contextRootWEB-INFclasses. 3. You may want to restart the Tomcat, and browser (to clear the browser's cache). Error Message: 500 Internal Server Error Symptoms: Browser fails to retrieve the requested resource Probable Causes: Many probable causes. Goto Tomcat's console to look for the error message. Scroll up slowly to look for the first-line of the error message. Solution: Solution depends on the error message. Correct the bugs in your servlet and recompile. Refresh your browser. You may want to restart the Tomcat, and browser (to clear the browser's cache).
More Configuration Options
Enabling Directory Listing
When the request URL refers to a directory instead of a specific file, e.g., http://host:port/hello/, you can configure Tomcat to serve the directory listing, or a welcome file,
or issue error "404 Page Not Found". Enabling directory listing is
handy for test server but NOT desire for production server (as it reveal
the directory structure and expose the entire directory hierarchy).
Enabling Directory Listing for All Web Applications: To enable directory listing for all the web applications, modify the $CATALINA_HOMEconfweb.xml, by changing "listings" from "false" to "true", for the "default" servlet, as follows:
<!-- The default servlet for all web applications, that serves static --> <!-- resources. It processes all requests that are not mapped to other --> <!-- servlets with servlet mappings. --> <servlet> <servlet-name>default</servlet-name> <servlet-class>org.apache.catalina.servlets.DefaultServlet</servlet-class> <init-param> <param-name>debug</param-name> <param-value>0</param-value> </init-param> <init-param> <param-name>listings</param-name> <param-value>true</param-value> </init-param> <load-on-startup>1</load-on-startup> </servlet> <!-- The mapping for the default servlet --> <servlet-mapping> <servlet-name>default</servlet-name> <url-pattern>/</url-pattern> </servlet-mapping> <!-- ==================== Default Welcome File List ===================== --> <!-- When a request URI refers to a directory, the default servlet looks --> <!-- for a "welcome file" within that directory and, if present, --> <!-- to the corresponding resource URI for display. If no welcome file --> <!-- is present, the default servlet either serves a directory listing, --> <!-- or returns a 404 status, depending on how it is configured. --> <welcome-file-list> <welcome-file>index.html</welcome-file> <welcome-file>index.htm</welcome-file> <welcome-file>index.jsp</welcome-file> </welcome-file-list>
When the directory listing is enabled and user requests for a directory, if the directory contains one of the files in the welcome-file list, the welcome file will be served; otherwise, the directory listing will be served. On the other hand, if the directory listing is not enabled and a directory request is received, the server returns an error "404 Page Not Found".
Enabling Directory Request for a Web Application: If you wish to allow directory listing of a particular web application only, you could disable the directory listing in "$CATALINA_HOMEconfweb.xml" globally, and define the following <servlet> and <servlet-mapping> in your application's "WEB-INFweb.xml", as follows. You need to use another servlet-name for the DefaultServlet.
<servlet>
  <servlet-name>DirectoryListing</servlet-name>
  <servlet-class>org.apache.catalina.servlets.DefaultServlet</servlet-class>
  <init-param>
    <param-name>debug</param-name>
    <param-value>0</param-value>
  </init-param>
  <init-param>
    <param-name>listings</param-name>
    <param-value>true</param-value>
  </init-param>
</servlet>

<servlet-mapping>
  <servlet-name>DirectoryListing</servlet-name>
  <url-pattern>/</url-pattern>
</servlet-mapping>
Automatic Servlet Reload
To enable automatic servlet reload (when a servlet is updated), you need to specify <Context reloadable="true">...</Context>, in "$CATALINA_HOMEconfcontext.xml" for all web applications, or the <Context> element in "$CATALINA_HOMEconfserver.xml" for a particular web application.
The following messages appear on the Tomcat's console if you creates a new version of a servlet:
XXX X, XXXX XX:XX:XX XX org.apache.catalina.core.StandardContext reload
INFO: Reloading Context with path [/hello] has started
XXX X, XXXX XX:XX:XX XX org.apache.catalina.core.StandardContext reload
INFO: Reloading Context with path [/hello] is completed
Enabling automatic servlet reload is handy during application development, but it requires significant runtime overhead and is not recommended for production systems. Instead, you could use the "Manager" to trigger reloads on demand.
Specifying the Context Root Directory
A server could run many web applications. A web application is also called a web context. The context root (or document base directory) refers to the base directory of a web application. They are two ways to configure a web context root:
- (RECOMMENDED) Create a directory under
$CATALINA_HOMEwebappsand store your web application resources under this directory. A context will be created automatically based on name of the directory. In the previous section, we created a directory called "hello" under Tomcat's "webapps". This application can be accessed by web users via URLhttp://host:port/hello. - Alternatively, you can write a
<Context>element in$CATALINA_HOMEconfserver.xml(the main Tomcat configuration file), to specify both the context's URL and the base directory, as follows:...... ...... <Context path="/ws" docBase="d:/workshop" reloadable="true"> </Context> </Host> </Engine> </Service> </Server>In the above example, we define a web context called "ws", with context root (docBaseor document base directory) at "d:workshop". This application can be accessed by the web users via URLhttp://host:port/ws.
Take note that:- The configuration creates a mapping from the "URL Path" issued by the web users to the "document base directory" in the server's file system, where you store your web application resources.
- Place the
<Context>element before the ending tag of<Host>element. - Use Unix-style forward slash
'/'as the directory separator in the configuration file, instead of Window-style back slash''. - The attribute
reloadable="true"asks Tomcat to monitor your servlets for changes, and automatically reload the servlets if changes is detected. This is handy for a development system, but inefficient in a production system.
Changing the Default "webapps" Directory
The default directory for deploying web applications is $CATALINA_HOMEwebapps. You could change the default by modifying the configuration file "confserver.xml" <host> tag's "appBase" attribute as follows:
<Host name="localhost"  appBase="webapps"
      unpackWARs="true" autoDeploy="true"
      xmlValidation="false" xmlNamespaceAware="false">
   ......
</host>
Deploying a Web Application in a WAR file
You could use the JDK's jar utility to "zip" up all the
files of a web application to produce a so-called WAR (Web Application
Archive) file for deployment, or distribution.
.... Change current directory to the web application's context root
contextRoot> jar cvf test.war .
Drop the test.war into $CATALINA_HOMEwebapps. A context called test will be created automatically. You can access the web application via URL http://host:port/test.
Tomcat actually unpacks the test.war into a "test" directory in $CATALINA_HOMEwebapps. You need to remove this directory, if you reload a new version.
Running Tomcat as a Windows Service
This section is applicable for Windows. You need to download the
Windows-specific version of Tomcat (from Tomcat's download, choose
32-bit or 64-bit Window zip, e.g., apache-tomcat-7.0.2-windows-x86.zip).
Read "Windows service How-To" in the Tomcat documentation ($CATALINA_HOMEwebappsdocswindows-service-howto.html).
In a production environment, it is more convenient to run Tomcat as a service, so that it can start automatically whenever the system is started (or re-start automatically after an unexpected interruption).
To install Tomcat as a service, start a CMD shell (with administrator right) and run the $CATALINA_HOMEbinservice.bat with install option:
... Change directory to $CATALINA_HOMEbin ...
$CATALINA_HOMEbin> service install
Installing the service 'Tomcat7' ...
......
The service 'Tomcat7' has been installed.
The Tomcat service called "Apache Tomcat 7" is installed and will start automatically whenever the system is started. Check the "Services" under "Control Panel" ⇒ "Administrative Tools".
A GUI application called Tomcat7w is available for monitoring and configuring Tomcat services. Launch Tomcat7w:
$CATALINA_HOMEbin> Tomcat7w
You could put the Tomcat icon in the system tray via the MS (Monitor Service) option:
$CATALINA_HOMEbin> Tomcat7w //MS//
You can start/stop the Tomcat service now via:
Tomcat7w;- "Control Panel" ⇒ "Administrator Tools" ⇒ "Services" ⇒ "Apache Tomcat 7" ⇒ "Start";
- From CMD shell, Issue "
net" command:prompt> net start tomcat7 The Apache Tomcat 7 service is starting.. The Apache Tomcat 7 service was started successfully. ...... ...... prompt> net stop tomcat7 The Apache Tomcat 7 service is stopping.. The Apache Tomcat 7 service was stopped successfully.
To uninstall Tomcat Service, run the $CATALINA_HOMEbinservice.bat with remove option:
$CATALINA_HOMEbin> service remove
The service 'Tomcat7' has been removed
A flip side of running Tomcat as a service is you need to read the error messages from $CATALINA_HOMElogs instead of the Tomcat console.
Tomcat's Startup Script
To start tomcat server, you could invoke the batch file "startup.bat" (in directory "$CATALINA_HOMEbin", where CATALINA_HOME refers to the Tomcat installed directory). The "startup.bat" invokes "catalina.bat start".
Alternatively, you could call the "catalina.bat" directly, which provides more options of starting Tomcat. Enter "catalina" to view the options:
$CATALINA_HOME/bin> catalina
Using CATALINA_BASE:   D:xxxtomcat7.0.xx
Using CATALINA_HOME:   D:xxxtomcat7.0.xx
Using CATALINA_TMPDIR: D:xxxtomcat7.0.xxtemp
Using JRE_HOME:        d:xxxjdk1.6
Usage:  catalina ( commands ... )
commands:
  debug             Start Catalina in a debugger
  debug -security   Debug Catalina with a security manager
  jpda start        Start Catalina under JPDA debugger
  run               Start Catalina in the current window
  run -security     Start in the current window with security manager
  start             Start Catalina in a separate window
  start -security   Start in a separate window with security manager
  stop              Stop Catalina
  version           What version of tomcat are you running?
Study the source codes of "Tomcat.bat" and "catalina.bat", if interested. Read "Command Shell - How to" about the syntax of batch files. At times, I need to use these files (comment-out the "ECHO OFF") to debug Tomcat's startup problems.
refer: http://www3.ntu.edu.sg/home/ehchua/programming/howto/Tomcat7_HowTo.html
ขึ้นไปด้านบน